Engines!
22 July 2018
Today was a big day!! I’ve been waiting to get onto the engines as they are the last of the big stuff and bring it all together.
This morning I got two sets of engine formers printed, stencilled and cut.
Thanks to my friends Patrick for the CAD drawings and David for the packaging ply. I had just enough to get them all done.


25 July 2018
Intake fans. I’m really excited! I’m starting to design some of the moving parts in the engines. The only way I can make sense of the intakes is that they are louvres that can change pitch to seal shut in space, but open in atmosphere. It’s not a very well thought out design, as from an engineering perspective, there are far better ways to do it.
They look fixed and are off centre, so they certainly can’t spin. I wish they could. It would look so much cooler if they did.


Using the first two formers of the starboard engine, I’m experimenting with some insulation board. I’ve bent it around and taped it in place, to see if it develops a curve memory overnight. If it does, I can then trim it to fit in between the boards. I’m also trying a heat gun to see if I can help it along.


27 July 2018
I’m going to try making them as fitted radial louvres and see how I feel about it. If I don’t like it, I will make the intakes spinning fans. To create the angle I have screwed some large wood screws into the timber behind the blades, using them as elevation gauges and a stop to set the height, then screwed down the trailing edge of each blade. I’ve painted the backing board a mat black, so it looks like you are looking into a dark engine cavity through the gaps in the louvres. Subject to change of course. Let’s see what happens.


4 August 2018
I tried it. I don’t like it. I remade it.
A spinning fan, when stationary, looks pretty much the same, so I grabbed an old pedestal fan motor and re-made the fan with oversized and overlapping blades this time. I have to source some thrust-bearings to square up the fan-plate and take the wobble out of it, but it is symmetrical, balanced and looks great in motion.


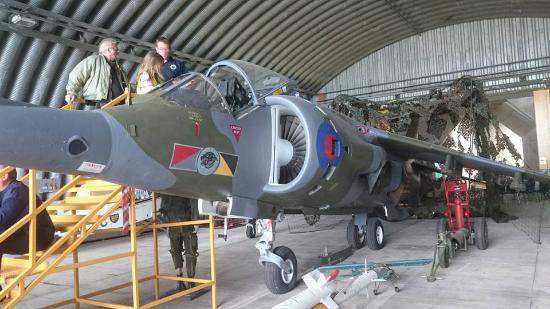
The fan has to go inside the ship’s fuselage just behind the cockpit, but that’s really no biggie. Even some of our modern day aircraft, like the Harrier Jump Jet have a similar design. I cut a slot in the side to allow for the fan.


12 August 2018
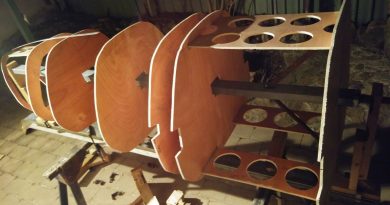
Modular breakdown of the engine nacelles. The engines are 2.41 metres, even before the exhaust goes on the end, so I’ve decided to break them in half for ease of storage, transport and assembly on site. Today I got the first half of the port nacelle framed up and formers spaced apart.

14 August 2018
The race against time! Once you open a can of this stuff, you have to use it all in one go or risk it going off in the can, or leaking propellant so you end up with a can of glue and nothing to push it out. It’s amazing how solid and rigid the structure becomes with all the polystyrene glued in place. I also reinforced it by gluing in a double wall behind the skin once it set. Ready for sanding.

18 August 2018
Welding engine frames continued.
My fortnightly Saturday off to work on the project has been building up. Friday afternoon I picked up all the steel to finish the engine frames.
I had to settle for galvanised steel as they were out of stock of the plain blue painted. I hate gal. Been poisoned badly before, welding this shit. Lots of extra grinding of the joints prior to welding to reduce it. Window and shed door wide open, fan on full blast…let’s get this over with.


25 August 2018
Starting to skin starboard engine nacelle. Each engine is 2.4 metres long, with approx 1 metre of exhaust cone behind it.


4 September 2018
This part has been dangerous! Trying to prop the engines in position alone, against the side of the Viper to check for fit. The modules aren’t that heavy for a one person lift, but they are EXTREMELY cumbersome. Mainly because they haven’t got a hard shell on them yet, so I can’t grab and lift from convenient edges.
Now they are in position, I can plan and weld on the attachment struts from frame to frame, using engineering geometries to strengthen it for support.


15 September 2018
Fitting the starboard engine.


27 October 2018
Top engine nacelle.


31 October 2018


3 November 2018


12 November 2018
This afternoon I ran the new orbital sander over the top engine nacelle, with a 40-grit pad. Wow! This thing does an awesome job!

13 November 2018
Outside surfaces all shaped and sanded. Inside of intake also. Some preliminary detailing next. Love this little orbital sander.


14 November 2018


18 November 2018
I need 20 of these, “Turkey feathers”, for each engine exhaust nozzle. By the time I’ve added a frame, lining and internal details it’s starting to get pretty heavy. The box-full you see below is enough for one nozzle, each feather comprising three shaped layers of plywood. To reduce weight, I’ve cut material out of the bottom layer with a hole saw. It’s made a big difference.


I’ve moved the top engine nacelle out of the workshop and next to the Viper so that I can work on the rear exhaust and get my workshop back. I had to keep climbing under it to move around my workbenches.

Tonight I continued skinning the engines with recycled polystyrene produce boxes. I can’t wait to hit this with the sander later in the week!

24 November 2018
Welcome to the Taj Ma Baz. Now that the roof is off and the tarp is up, I was able to finish skinning the top of the Viper and put the top engine on. All the top and side surfaces are now skinned and glued, with a little skinning left on the bottom.


15 December 2018
I’ve been working on concurrent activities all over the ship, but while some things are on hold, waiting for the right moment/planets to align,. my workbench at home has the engine exhausts on the go.
I toyed with roll-forming steel rings to make a cage, but the hollow section profiles proved problematic at best, so I have gone back to wood.
Here’s the top engine exhaust under construction.


After working on the spacing a little, I ran out of reasonable hours to keep making noise, so I started planning out the turbine fans in aluminium plate.


17 December 2018
Painting time!


20 December 2018


I’ve had a few wonderful days home alone to work on the Viper. It’s strange, I haven’t uttered a word. I could get used to this.
Anyways, I went out to my work and spent a night on the bandsaw to cut all the turkey feathers for the other two engines. Much quicker and neater than my jigsaw, plus the belt grinders there have an extraction fan right next to them, so I sanded and shaped them all too. I can do this at home, but with no extraction, the dust is pretty unbearable.


Take two. I’m approaching the engine maintenance panels a different way. A large plastic barrel idea I tired, didn’t work. Now trying wooden arcs of different diameters, shaped and carved then sandwiched together.
I’m using pieces of timber from my demolished pergola to make engine forms.


15 May 2019
The next and one of the final outer detail jobs, are the mechanicals under the top engine cowling. Surprisingly easy to replicate, once I stopped to study it.
Here’s a reference photo from the screen-used prop.

Again, lots of leftover materials used, but I had to buy a length of PVC pipe that was a specific diameter that I didn’t have. My next door neighbour gave me a heap of old 50mm pipe. Design work chicken scratches on a bit of old ply, after using a tape measure up on the engine and my blurry MkI eyeball. Gets the job done.


21 May 2019
Starting to fit mechanical into the top engine nacelle.


4 June 2019


29 May 2021
Adding top nacelle engine details using an old bucket, scrap sheetmetal welded together and some copper pipe.


Great stuff, to see rhe past progress all together on one page! The girl is almost ready to kick some cylon ass! 🙂